 Home Calendar Speedsters Event-Photos Engines Technical Construction John-Blacks-#917 WoodCars Model-A-Chassis Speedster-Design Survey Planking CNCRouter Model Strongback Strip-Building Bodies Heads Carbs Water-Pumps HighPerformance RearEnd-Tranny Front-Ends Wire-Wheels Engines All-Vintage-Ford Clubs-Museums Racing Hill-Climbs Endurance-Runs GreatAmericanRace Historics Automobilia Organization ContactUs Videos |
Construction Process |
||||
|
The Model revealed several Construction Process issues. They are listed here in no particular order. |
|||||
|
|
|||||
|
|
|||||
|
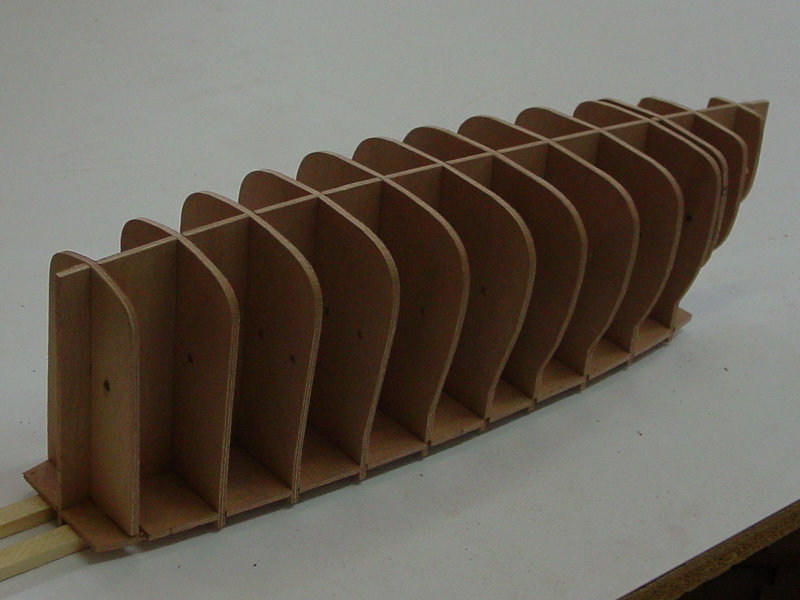
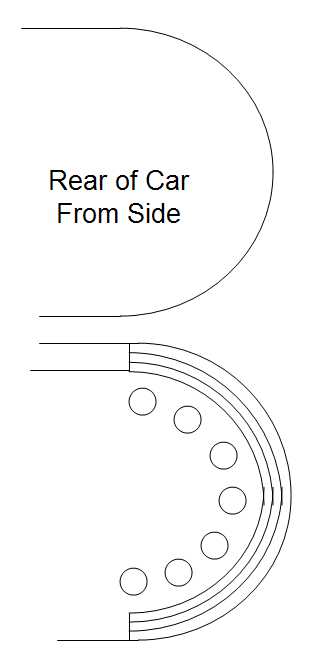
The Tail needs a Stem --
Where the strips come together at the back, there needs to be some wood to glue the strips to and increase the strength. This "stem" stays with the body. The idea is to cut down the center wall of the Strong Back about an inch+ short of the final exterior. Clamp holes are also cut. Then a stem is laminated around the end of the plywood. It is a good idea to also laminate up an outer stem that can be attached later to cap the ends of the planks. This stem needs to be continuous from top to bottom of the rear end which means both top and bottom of the car needs to be built on the same Strong Back. |
|
||||
| A Separate Bottom Rear and Stem Strong Back is needed so the bottom rear and stem can be built first, epoxied outside, removed from the Strong Back, epoxied inside, and then be remounted on the big Strong Back for the rest of the body. | |||||
| The Top needs a Stiffening Board -- There needs to be a board (a good 1x4) that is laminated into the stem and runs from the stem to the front of the car ... stopping 1" back from the front of the hood so the hood can rest on the radiator cowel. The Strong Back needs to provide support for this Stiffening Board. | |||||
| Clamp Holes Needed -- Clamp holes are needed for the Stem, the Top Stiffening Board, and a couple of inches from the edges of sections. Paul Ford pioneered anchoring an inner tube section in a hole, passing the inner tube section over the outside of strips you are installing, attaching the inner tube to a rope that runs over the completed strips. Then use a stick through the inner tube section to wind the inner tube and rope tight. This holds the strips tightly together and to the Strong Back section. It may be an assist to traditional clamping of the strips. | |||||
| Clamping Boards Needed -- There has to be a way to clamp the strips to the Strong Back Sections. There are 2 approaches : cut a dado 3/4" back from the edge of the sections or cut boards 3/4" wide and attach them to the edge of each section. The Dado method requires good plywood. On a small structure like a Kayak its probably the way to go. The extra cost of using marine or other good plywood for the Strong Back Sections would be small, but this is a big structure so it is probably better to use CDX for the sections and cut the clamping boards from a single sheet of good plywood. | |||||
|
Strong Back Needs to Collapse -- The Body is narrower at the bottom than at the top so it will not lift off the Strong Back. (It has tumblehome) The Strong Back will have to collapse to get the body off it. Some people attach the sections to the center wall with door hinges then just knock the pins out to remove the sections. I like the interlocking Strong Back sections. My approach is to make the sections of the center wall between the sections removable so the sections can be slid along the center wall to the cockpit opening and then lifted out of the cockpit. |
|||||
|
|
|||||
| Body with Epoxy on outside needs Support -- The body needs an outer cradle to hold the body in its shape while epoxy is applied to the inside. 5 outer U shaped holders big enough to go over the Body. They are put in place before the Strong Back is collapsed and stay in place while the body is rotated upside down so the inside can be epoxied. |
|
||||
| Strip Positioning -- The first strip that is applied is the lowest strip that runs from radiator to tail. It needs to be precisely located on the Strong Back and the adjacent strip needs to be precisely located on the Bottom Strong Back. The way to do this is to cut a 1/2" long groove in the edge of the strong back sections with a 7/32" bit so that a chip of 4MM ply can temporarily be put in the grove to rest the first strip on. | |||||
| Part Labeling -- Every part that is not obviously identifiable should be labeled so it goes in the right place. | |||||
| Hood Strong Back -- A strong back needs to be constructed so extra hoods can be built. | |||||
| The Bottom Rear needs to be shaped to miss the differential | |||||
|
Other Parts to Cut --
Firewall & Sloped Floor
|
|||||
|
|
|||||
|
Home || Calendar || Speedsters || Events || Engines || Technical || Historics || Organization || Contact Us |
|||||
|
Copyright 2002 and succeeding years -- Northwest Vintage Speedsters |
|||||
|
Suggestions or Comments on Our Web Site ? |
|||||