 Home Calendar Speedsters Event-Photos Engines Technical Construction John-Blacks-#917 WoodCars Model-A-Chassis Speedster-Design Analysis Overview Software Creating the Shape Constraints Measuring Narrow Frame Widest Point Curve Top Curve Radiator Curve Mid-Car Curve Rear Curve Skirt 6 Designs Survey Planking CNCRouter Model Strongback Strip-Building Bodies Heads Carbs Water-Pumps HighPerformance RearEnd-Tranny Front-Ends Wire-Wheels Engines All-Vintage-Ford Clubs-Museums Racing Hill-Climbs Endurance-Runs GreatAmericanRace Historics Automobilia Organization ContactUs |
Establishing the Radiator Curve |
|
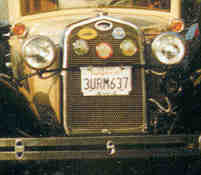
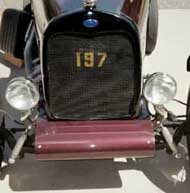
| The Model A Ford has 2 available Radiators : | ||
|
|
|
|
| The curves on the '30-31 radiator are barely within the capability of the strips to bend around. This radiator sides are nearly straight and it is very tall. | The curves on the '28-29 radiator are easier for strips to bend around, the sides are rounder, and the radiator is lower. This is a preferable radiator shape. | |
|
There are many other Radiator
Shapes that a speedster could use.
I decided to use the '30-31 radiator because I had it. I decided to move the radiator forward. I put a 1/2" pipe across between the forward frame horns to protect the radiator. This limited how far forward the radiator could move. I moved it about 5-1/2" or to within 3/4" of the pipe. |
||
|
I dropped the radiator about 3". How low it
could go was governed by the engine.
I had decided that I would have a hood, but not sides on the engine compartment. Epoxy creeps above about 100 degrees. There is a discussion of this problem on the Epoxy page. Sides would increase the heat. Sides would also be flat and since the radiator shell sides are straight. Eliminating the engine sides allowed curve in all body parts. I wanted the bottom side line on the hood to be straight. This meant the hood side line had to be 1" above the air cleaner ... high enough so the air cleaner will not hit on the hood when the engine torques, but also the hood needed to wrap down to where the straight sides started down.... to cover the shell's side mounting hole. |
|
|
|
|
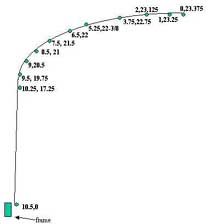
I took very exact measurements of the Radiator Shell since its curves will dictate the shape of the forward area of the body. The measurements I finally used were to the Radiator shell lip that the hood will sit on, allowing for a thin leather strip that is woven through the holes in the Radiator Shell to serve as padding.
|
|
|
I put the curve in Rhino, copied it and then rebuilt and simplified the curve. When I examined the maximum difference between the simplified curve and the original curve it was .0021" which is very acceptable. I plotted the curve at full scale (1:1) and checked the curve against the mounted radiator shell. After that check I used our CNC router to cut a 3/4" plywood pattern to check the hood curve. This all sounds like a lot of trouble, but this is the one place where the body will fit hard against a shaped metal surface. It needs to be right. |
||
|
Once I had the curve correct, I extended it 10" below the top of the frame... the lowest point the Skirt could possibly reach. |
||
|
There are other issues which need to be considered here and which are discussed in more detail in the Building with Strips pages. The epoxy and cloth are hard to end smoothly at the edges so the strips are run 3" long and the hood is cut to length after the epoxy and cloth are done on both sides. The exposed wood is soft so a thin epoxy designed to soak into the end grain is applied to harden the wood up and that is epoxied over. There is still some worry that the edge will not withstand vibration and the movement of the radiator shell. Remember the torqueing engine will flex the weak frame and twist the Radiator Shell in relation to the Firewall. The hood has to live through this. At this writing I am looking for a 1/4"x1/2" thin, flexible L molding that can be added to the bottom and end edges of the hood. When this is found I will tweak the curve to make room for it. |
||
| The Radiator curve is the simplest because the radiator shell defines it for you. The next easiest curve is the Longitudinal curve that defines the widest point of the body. | ||
|
Home || Calendar || Speedsters || Events || Engines || Technical || Historics || Organization || Contact Us |
||
|
Copyright 2002 and succeeding years -- Northwest Vintage Speedsters |
||
|
Suggestions or Comments on Our Web Site ? |
||