 Home Calendar Speedsters Event-Photos Engines Technical Construction John-Blacks-#917 WoodCars Model-A-Chassis Speedster-Design Analysis Overview Software Creating the Shape Constraints Measuring Narrow Frame Widest Point Curve Top Curve Radiator Curve Mid-Car Curve Rear Curve Skirt 6 Designs Survey Planking CNCRouter Model Strongback Strip-Building Bodies Heads Carbs Water-Pumps HighPerformance RearEnd-Tranny Front-Ends Wire-Wheels Engines All-Vintage-Ford Clubs-Museums Racing Hill-Climbs Endurance-Runs GreatAmericanRace Historics Automobilia Organization ContactUs |
|
|
Creating the Shape |
|
|
|
|
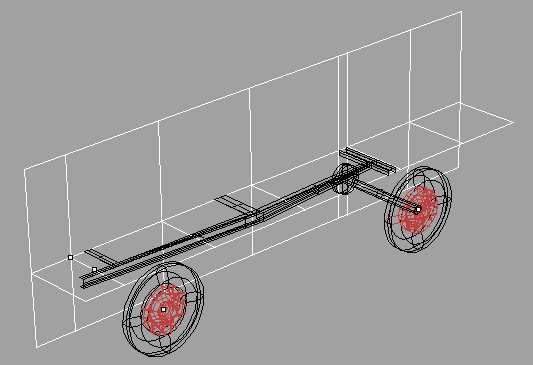
| I started by laying out 2 intersecting planes... One along the center line of the Speedster and one at the Top of Frame Level. I put positioning lines at the back of the Radiator Shell, the Firewall, the center of the body (it is the widest point of my body), the forward edge of the slot in the body for the rear axle, the rear edge of that slot, the rear of the car. I also created horizontal planes at 4" above, 6" below and 10" below the Top of Frame (not shown). This is all to make the design tasks easier. I also created named CPlanes to make working on all these elevations easier. | |
|
I created separate layers for : Frame, Gear Shift, Steering Wheel, Clutch Movement, Seat, Radiator Curve, Radiator Core, Radiator Shell, Rear Axle, Widest Point Longitudinal Curve, several Mid Car Curve alternatives, several Rear Curve alternatives. I think the more layers the better and I seldom throw away earlier tries at curves. |
|
|
To construct the body several sections need to be taken and a mold built by mounting the sections on the Strong Back. You can take these sections from planes that you construct (I did this) or you can use the Proteus Slicer plugin. I positioned the first section 1"aft of the Radiator Curve. Other sections were then spaced every 8"-12". |
|
|
There are 3 curves that are easy. Do these first : |
|
|
Then do a body with a rear curve and as few mid-car curves as you can have to still get your shape. I approached this by doing the rear curve and one Mid Car Curve at the mid point of the car. This generated a body. Then I took a section at the firewall and a couple of rear sections. Then I tweaked those curves. I used the Fair Command and the curvature graphs to get things fair. This all takes time and practice. The Rhino 3D Modeling for the Marine Industry Advanced Training CD explains all the steps. |
|
|
Do these curves after you finish the
curves above. |
|
|
|
|
|
Home || Calendar || Speedsters || Events || Engines || Technical || Historics || Organization || Contact Us |
|
|
Copyright 2002 and succeeding years -- Northwest Vintage Speedsters |
|
|
Suggestions or Comments on Our Web Site ? |
|